If you've heard a developer say "I opened a PR, can you review it?" or "is it merged into main yet?" and weren't sure what that meant, this article is for you. GitHub isn't only a developer tool. Understanding how it works helps designers follow progress, review the real interface before launch and collaborate with developers more smoothly.
In short: Git records the history of a project; GitHub stores that project online so the whole team can work on it. You don't need to write code to read, comment and review.
Git vs GitHub
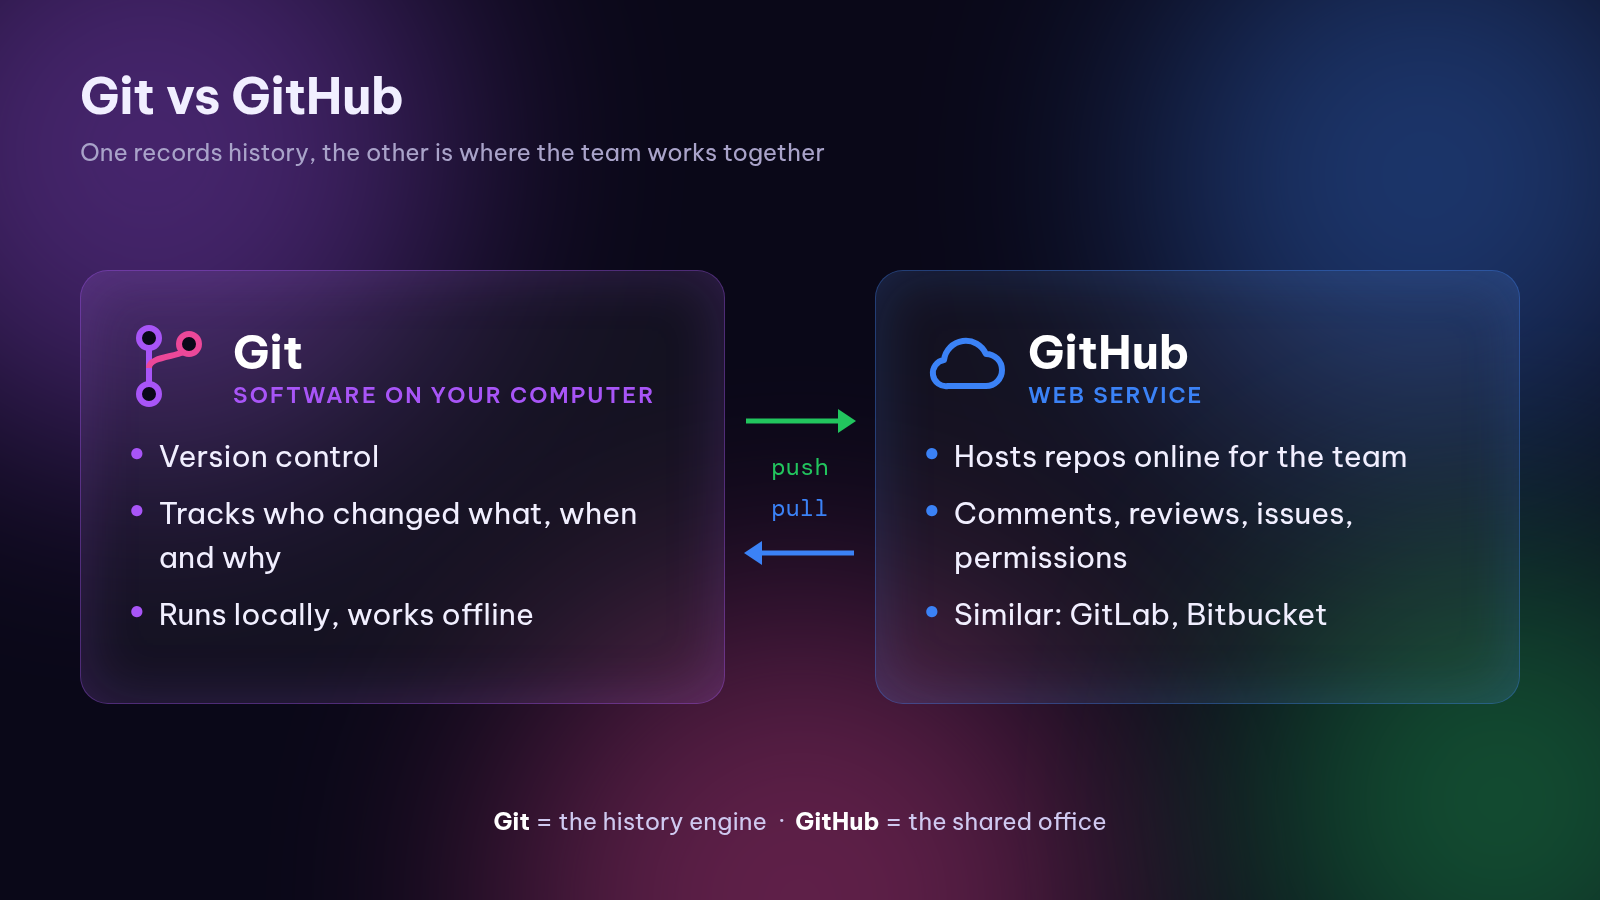
Git is version control software. It tracks every change in a folder: who changed what, when and why. Git runs on your computer and works offline.
GitHub is a web service that hosts Git projects and adds collaboration tools: comments, reviews, task tracking and permissions. Think of Git as the history engine and GitHub as the shared office where the team meets. Similar services include GitLab and Bitbucket.
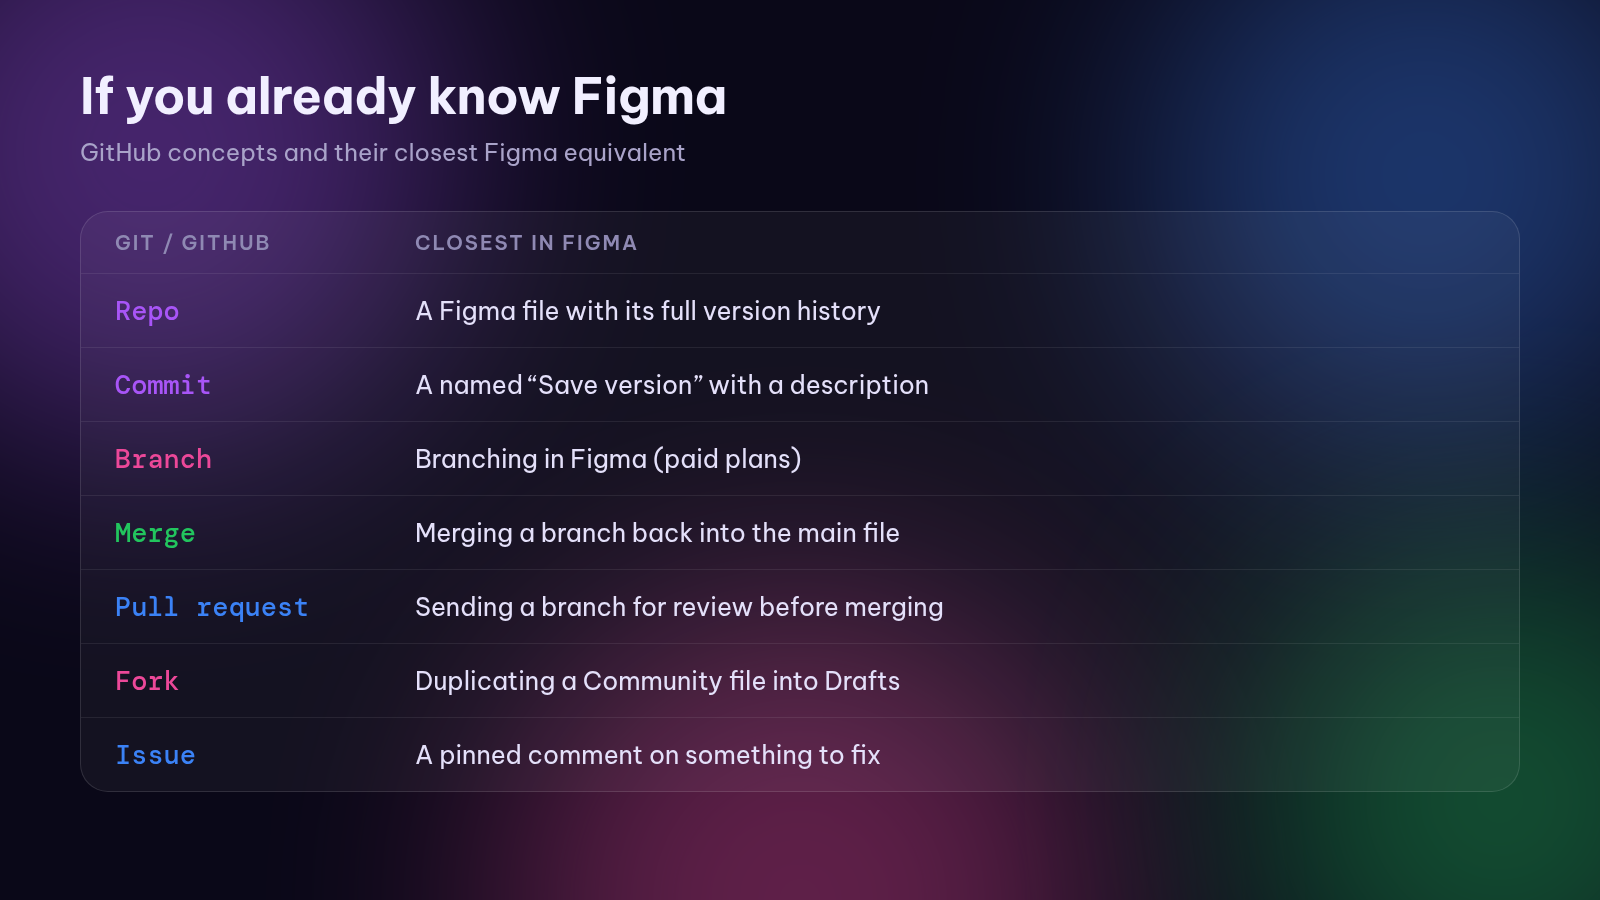
Compared with Figma: Figma saves version history automatically. Git also keeps history, but you decide when to save a checkpoint and write a description for it.
Repository: a project folder with its full history
A repository (repo) is a project folder: code, images, config files, docs, plus the entire history of changes. Most repos include a README.md that explains the project and how to run it.
A repo lives in two places: the copy on GitHub (remote) and the copy on each person's computer (local). People work locally, then sync with GitHub.
Commit: a saved checkpoint with a note
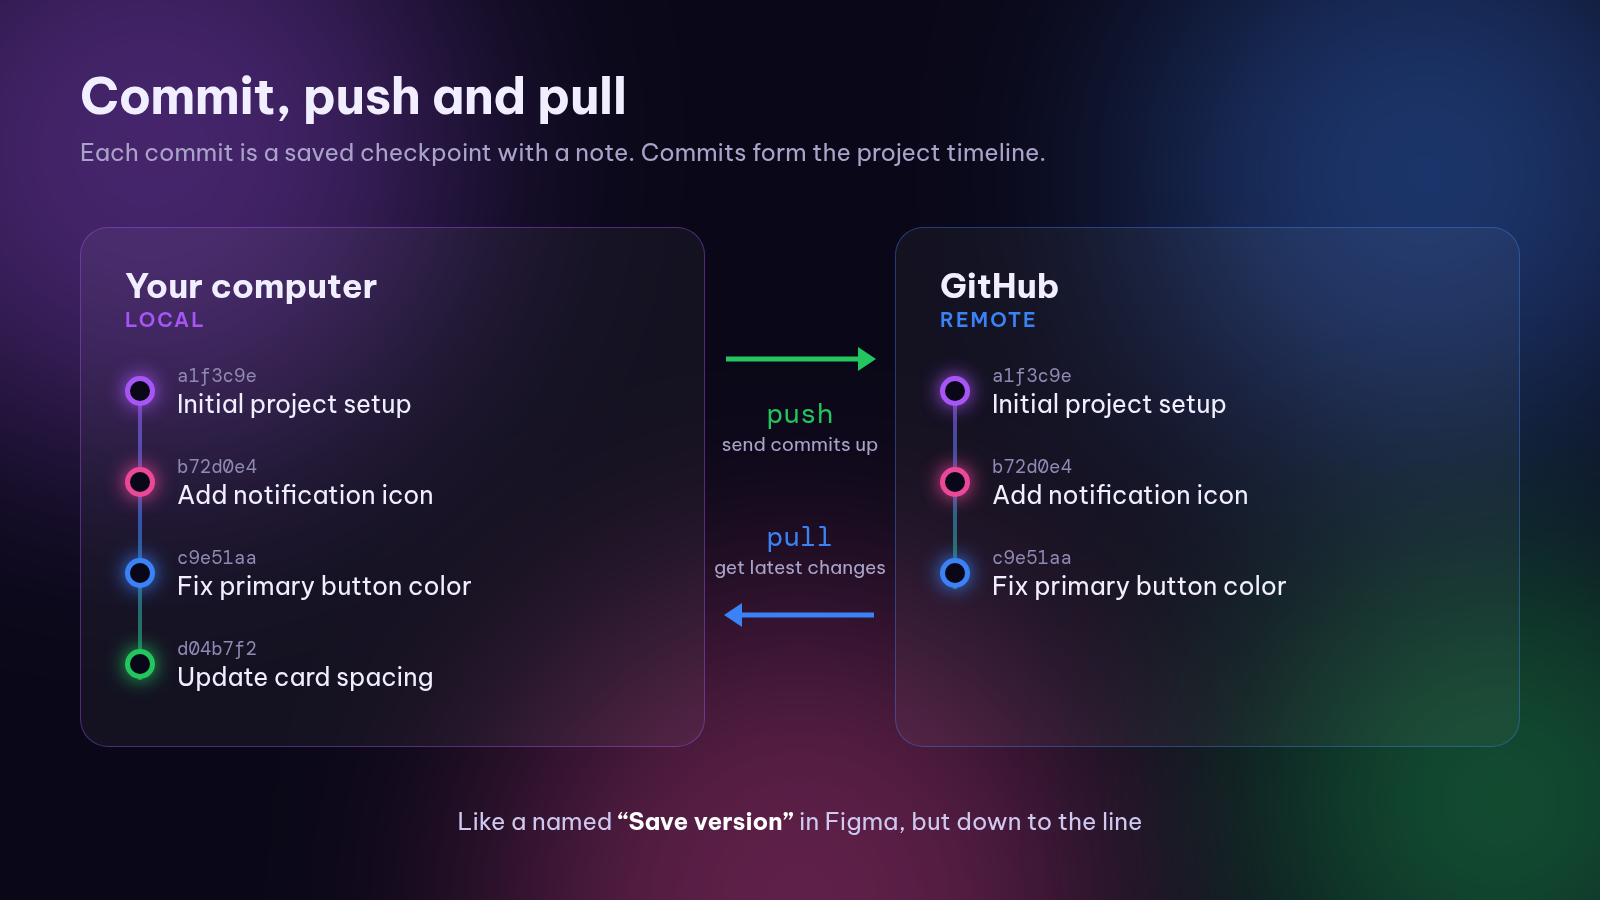
A commit is a snapshot of the project at one moment, with a short message like "Fix primary button color" or "Add notification icon". A chain of commits forms the project's timeline.
Commits let the team see exactly which lines changed and who changed them, and roll back if needed. It's like a named "Save version" in Figma, but down to the line.
Two related actions: push sends your commits from your computer to GitHub; pull brings the latest changes from GitHub to your computer.
Branch: your own line of work
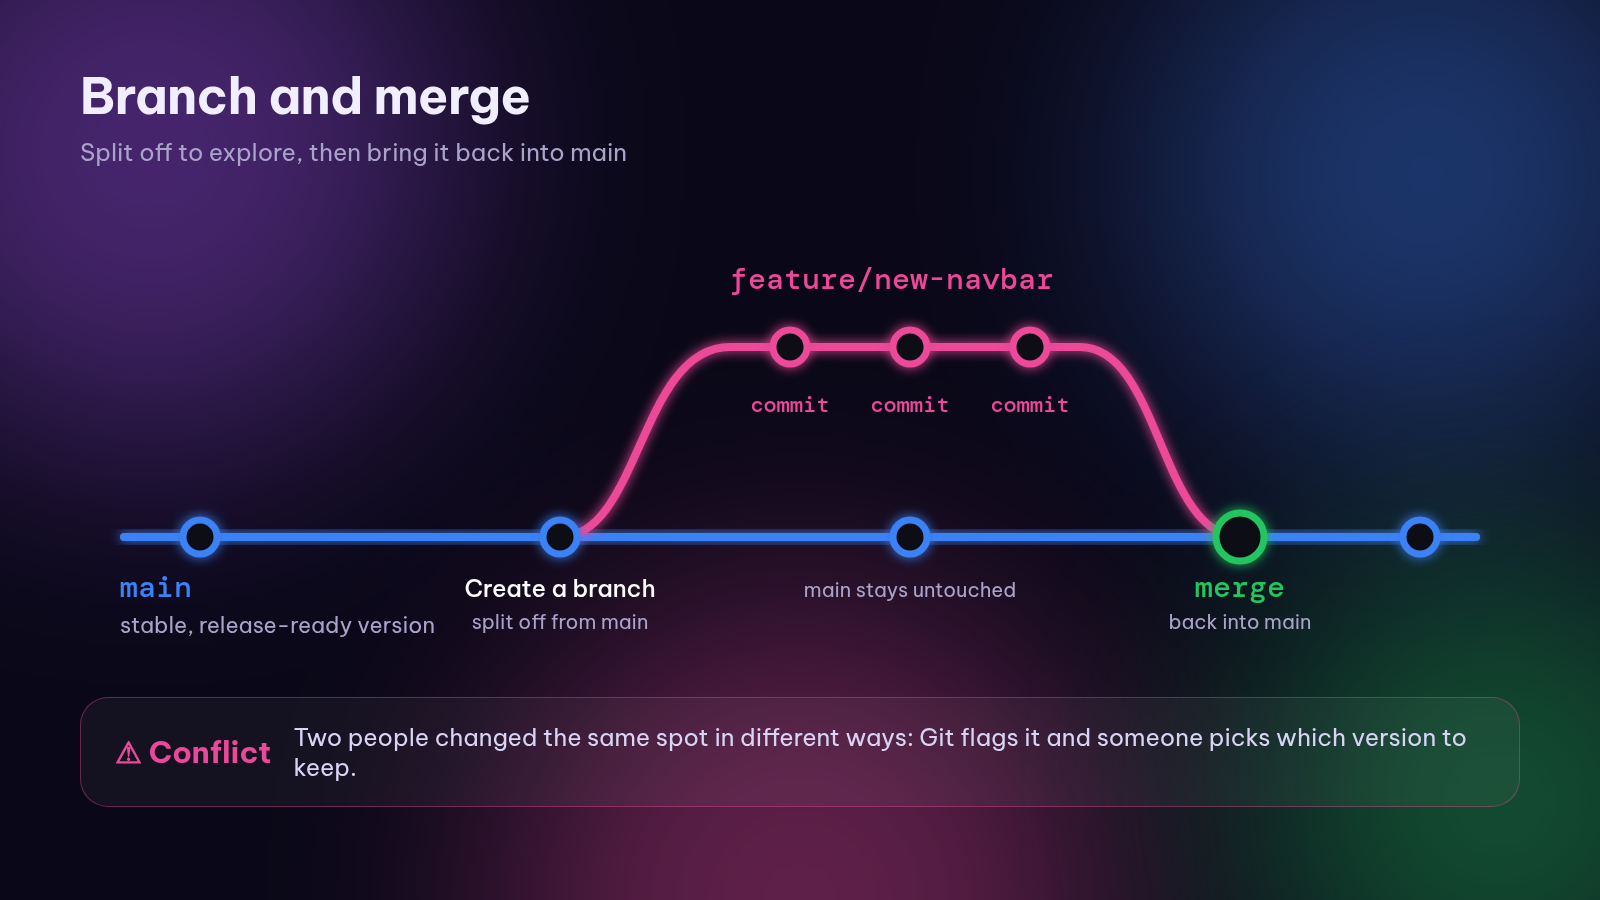
A branch is a parallel line of the project. The main branch is usually called main: the stable, release-ready version. For a new feature, a developer creates a branch like feature/new-navbar and experiments freely without affecting main.
Figma offers branching on paid plans with the same idea: split off, explore, then bring it back. The difference is that in Git, branching is the everyday default, and each person often has several branches at once.
Merge: bringing a branch back
Merging combines changes from one branch into another, usually into main. Git combines changes that don't overlap automatically. If two people changed the same spot in different ways, Git reports a conflict, and someone chooses which version to keep.
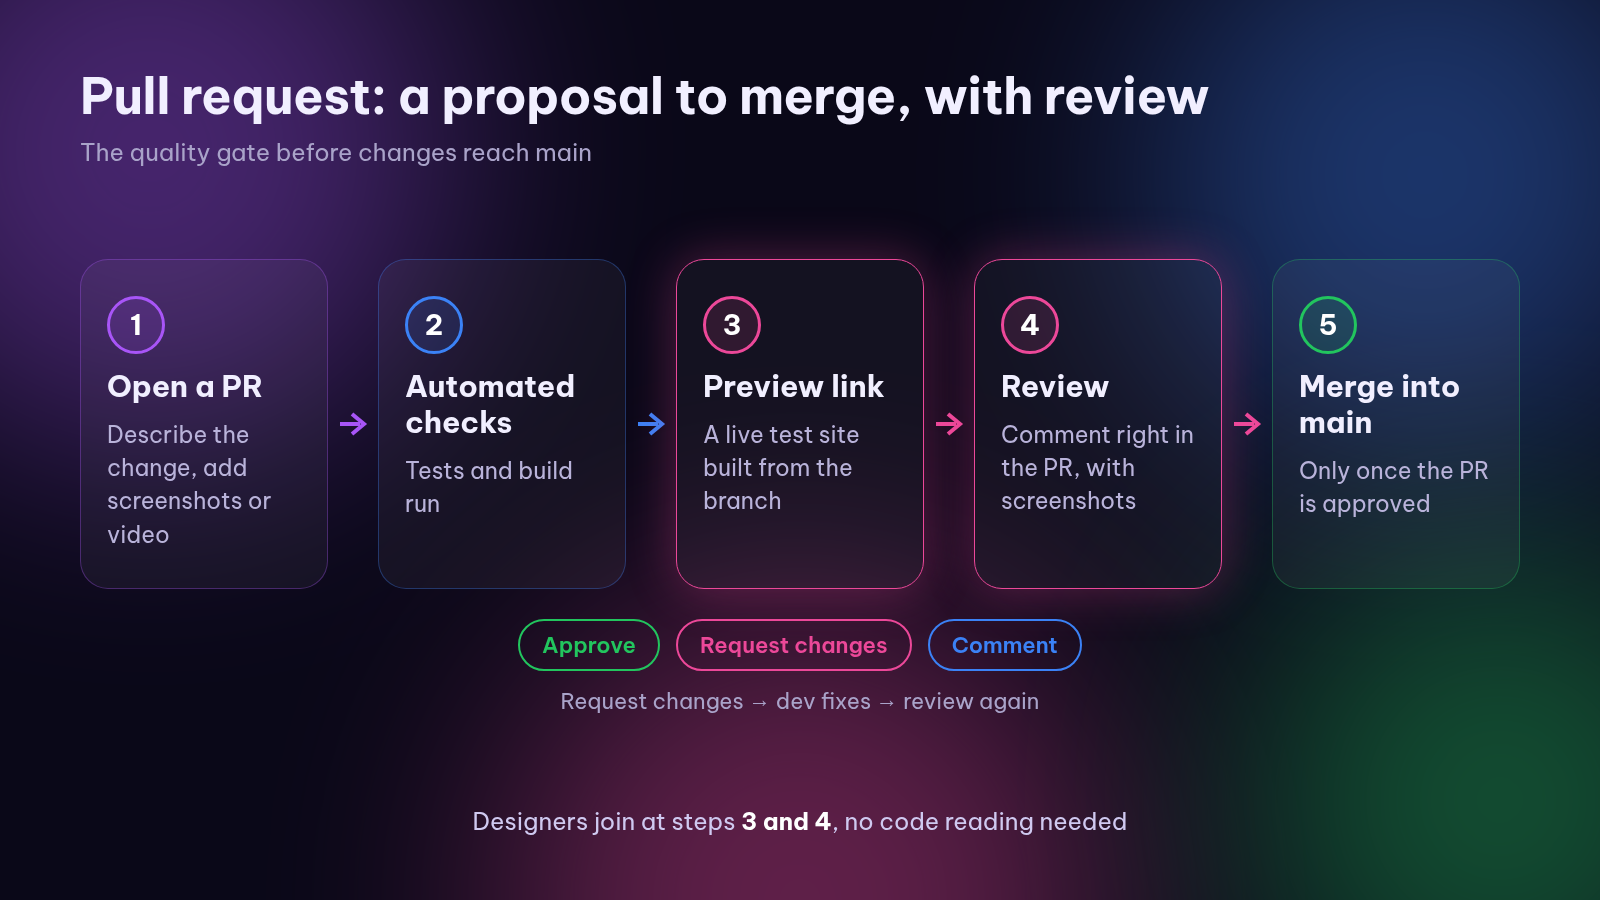
Pull request: a proposal to merge, with review
A pull request (PR) says "please merge my branch into main". This is where designers get involved most. A PR usually includes:
- A description of the change, sometimes with screenshots or video.
- The list of changed files and lines.
- Comments and reviews from teammates: Approve, Request changes or Comment.
- Automated checks, and often a preview link: a live test version of the site built from that branch by services like Vercel, Netlify or Lovable.
Only approved PRs get merged. It's the team's quality gate.
Issues: the to-do list
Issues track bugs, ideas and tasks. Each issue has a title, description, images, an assignee and labels. Issues can be linked to PRs so they close automatically when the PR merges. With GitHub Projects, issues become a Kanban board similar to Trello or Jira.
For designers, issues are a great way to report UI bugs: a screenshot, the expected result and a Figma link.
Clone and fork
Cloning downloads a copy of a repo, with its full history, to your computer so you can work on it or run it.
Forking creates a copy of a repo under your own GitHub account. Forks are common when you want to contribute to someone else's project (like open source) without write access: you change your fork, then open a PR back to the original. It's like duplicating a Figma Community file into your drafts.
How designers collaborate with developers on GitHub
1. Review PRs through preview links. You don't need to read code. Open the preview, check spacing, color, hover states and responsiveness, then leave comments or screenshots right in the PR. It's the cheapest moment to fix UI issues.
2. Design tokens in the repo. Colors, typography, spacing and radii are often stored as token files (for example JSON) in the repo. When you change variables in Figma and export them as tokens, the change reaches code through a PR. Plugins like Tokens Studio can sync tokens with GitHub.
3. Figma-to-code handoff. Paste Figma frame links into issues or PR descriptions so developers and reviewers can compare. Tools like Dev Mode and Code Connect link Figma components to code components.
4. Make small fixes yourself. Typos, a color value, an icon swap: you can edit on GitHub, create a branch and open a PR for a developer to review.
Where to start
- Create a GitHub account and ask a developer to add you to the team repo.
- Read the README and the Pull requests tab to learn what the project contains and who is working on what.
- Use GitHub Desktop: an app with a visual interface for cloning, branching, committing and pushing with buttons instead of the command line.
- Try github.dev: on any repo, press the
.(period) key to open an editor in your browser. Great for editing text or a small token file. - Create a personal repo to practice: store your portfolio or a token file, then try committing, branching and opening a PR to yourself.
- Review a real PR: open the preview and leave one specific comment with a screenshot.
Quick glossary
- Repo: project folder + history.
- Commit: a saved checkpoint with a note.
- Push / Pull: send to / get from GitHub.
- Branch: a separate line of work. main: the main branch.
- Merge: combine branches. Conflict: two changes collide.
- Pull request (PR): a proposal to merge, with review.
- Issue: a task or bug.
- Clone / Fork: copy to your computer / copy under your account.
Conclusion
GitHub may sound like a developer's world, but its mechanics are close to how designers already work: save versions, branch off to explore, ask for feedback, then finalize. Once you understand repos, commits, branches and pull requests, you can review the real product earlier, give feedback in the right place and become the bridge between design and code.